
Blot're Javascript Weather Client
Hooking shit up to Blot’re just got easier thanks to Blot’re.js. Blot’re.js is a thin Javascript / Node wrapper around the Blot’re REST API that can help you quickly query, obtain user authorization, and perform update operations against Blot’re.
The best way to learn is by doing, so let’s use Blot’re.js to create a simple weather application for Blot’re. This app will display the current temperature in a user’s stream. You can find the complete source for this example here.
Update - June 6, 2015
I’ve created a Javascript helper framework that greatly simplifies creating command line, disposable client applications.
Getting Started
Blot’re.js is registered as 'blotre' on npm.
$ npm install blotre
Empty Client
Blot’re.js exports a class that handles all communication with https://blot.re. This class also maintains client state, such as credentials and client info.
We create an empty client using new or the .create() static method.
var Blotre = require('blotre').
var client = new Blotre();
Basic Queries
Our newly created client has no credentials, or client information that could be exchanged for credentials, but it can read data using the Blot’re REST API.
Let’s use our empty client to lookup the most recently updated streams. All of the Blot’re.js request APIs return Bluebird promises.
client.getStreams()
    .then(console.log)
    .catch(console.error);
[ { id: '5550fcc9300496217de54ebf',
    name: 'Matt',
    uri: 'matt',
    created: 1431370953683,
    updated: 1432189265623,
    status:
     { color: '#4b0082',
       created: 1432189265623,
       poster: '5550f2a63004a531be8820c5' },
    owner: '5550f2a63004a531be8820c5' },
  { id: '555ad6113004fc1a44acfe0b',
    name: 'Toaster Engine Status',
    uri: 'toastmastergeneral/toaster+engine+status',
    created: 1432016401802,
    updated: 1432102089127,
    status:
     { color: '#00623c',
       created: 1432102089127,
       poster: '5550f2a63004a531be8820c5' },
    owner: '5550f2a63004a531be8820c5' },
   ...]
Blot’re.js is just a thin wrapper around the Blot’re REST API. Most request methods take an optional options object which is used as the query string of the request. So if we wanted to lookup only those streams that contain the word 'toast', we would use the 'query' query string parameter and write:
client.getStreams({ query: "toast" })
    .then(console.log)
    .catch(console.error);
[ { id: '555ad6113004fc1a44acfe0b',
    name: 'Toaster Engine Status',
    uri: 'toastmastergeneral/toaster+engine+status',
    created: 1432016401802,
    updated: 1432102089127,
    status:
     { color: '#00623c',
       created: 1432102089127,
       poster: '5550f2a63004a531be8820c5' },
    owner: '5550f2a63004a531be8820c5' }]
Authorization
But our weather app will need to both read and update streams. And update operations require user authorization.
Blot’re supports two means of authorization: OAuth2 authorization code flow and disposable/single use clients. Blot’re.js provides helper methods for both.
Authorization Code
The OAuth2 authorization code flow is the preferred authorization approach, but is not the best first fit for our simple weather app. So, while we’ll actually use disposable client authorization, let’s quickly take a look at how the authorization code flow works.
Any client application that uses the authorization code flow must be registered with Blot’re. After completing registration, grab the client_id, client_secret, and a redirect_uri for use with Blot’re.js.
var client = Blotre.create({
    client_id: "5558ef1330042320bd1ff8b2",
    client_secret: "Y2JkNzY3ZWMtODVlZS00NjM5LWEyNmUtNzJkOGY2NjdjYTNl",
    redirect_uri: "http://localhost:50000"
});
The client still has no credentials yet, but now it does have a means of obtaining user authorization.
As the first authorization step, we must direct the user to visit an authorization confirmation page on https://blot.re. getAuthorizationUrl returns the url of the page that the user should visit to authorize our client.
client.getAuthorizationUrl();
https://blot.re/v0/oauth2/authorize?response_type=code&client_id=5558ef1330042320bd1ff8b2&redirect_uri=http%3A%2F%2Flocalhost%3A50000
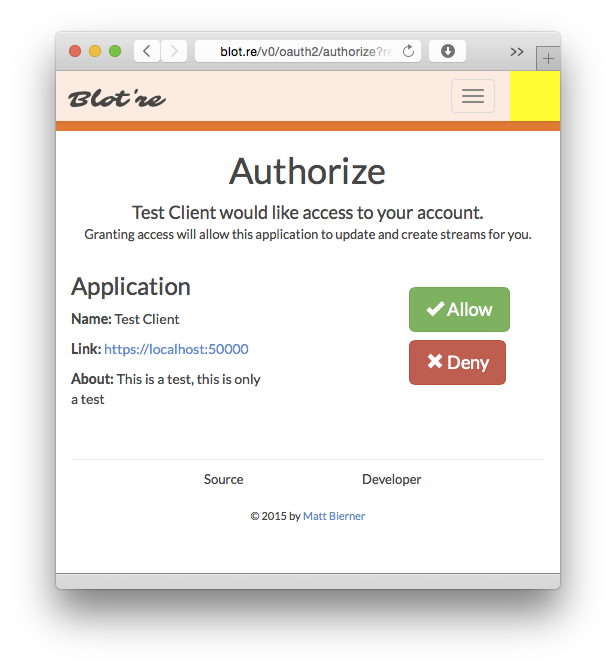
The user then sees this page.
If the user authorizes our application, Blot’re redirects them back to our server at redirect_uri and sends along a new authorization code. Our server can then exchange the received authorization code for an access token using redeemAuthorizationCode.
client.redeemAuthorizationCode('ZTdmMWMyYjAtYWNmZS00Y2FlLTg2YzAtMDUxZDc5NWYxYmI0')
    .then(function(newCreds) {
        client.setCreds(newCreds);
    });
redeemAuthorizationCode itself does not update our client’s credentials, so be sure to call setCreds if the request completes successfully. Now any future requests will automatically attach the acquired credentials.
Disposable Client
The authorization code flow has at least one big drawback for our weather app, the redirect_uri to which the authorization code is sent must be publicly reachable by the user agent. That’ll require some kind of server and sounds like a lot of work for such a simple app. All we really want to do is talk to Blot’re on behalf of a single user. And that’s precisely what the Blot’re disposable client authorization flow was designed for.
A disposable client looks and behaves much like a regular Blot’re client, except that it can be authorized by at most one user. createDisposable creates a new disposable client. The name and blurb parameters must be provided and will be shown to the user during the authorization confirmation flow.
var client = Blotre.createDisposable({
    name: "The Global Toaster",
    blurb: "Current temperature"
});
createDisposable returns a future to a new Blot’re.js client. The new client has a client_id and client_secret, but it is not bound to a specific user yet and does not have any credentials.
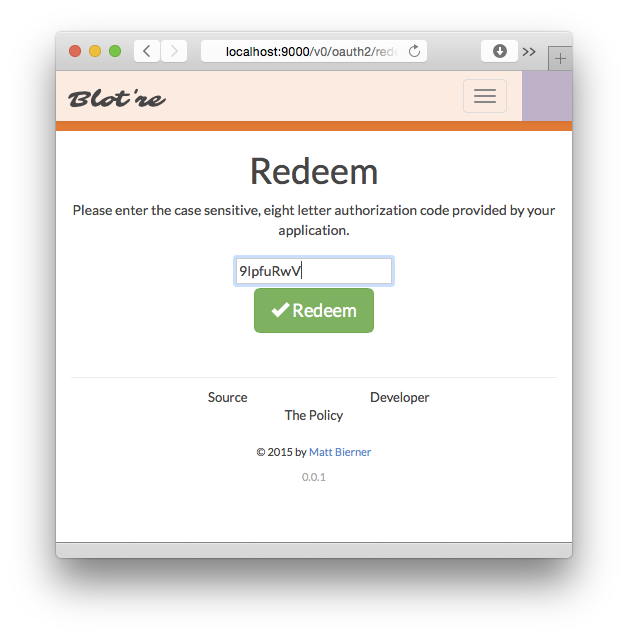
The user can now authorize our new client application by visiting https://blot.re/v0/oauth2/redeem and entering the unique, eight letter authorization code generated for our new client and stored on client.client.code.
var askAuth = function(client) {
    console.log("Code:", client.client.code);
};

Blotre.createDisposable({
    name: "The Global Toaster",
    blurb: "Current temperature"
})
    .then(function(client) {
        askAuth(client);
        tryRedeem(client, console.log);
    });
Once the code has been redeemed, our client can exchange its credentials (client_id and client_secret) for an access token using redeemOnetimeCode.
/// Wait for user input and then redeem the code
var tryRedeem = function(client, callback) {
    console.log("Press enter once you have authorized.")
    process.stdin.resume();
    process.stdin.setEncoding('utf8');

    process.stdin.once('data', function(chunk) {
        client.redeemOnetimeCode()
            .then(function(creds) {
                // Update the credentials
                client.setCreds(creds);
                callback(client);
            })
            .catch(console.error);
    });
};
Any user can redeem the code generated for a disposable client, although the code may only be redeemed once. If the code expires without having been redeemed, we must create a new disposable client and prompt the user again. But if everything worked as expected, our new client should now have credentials be authorized to talk to Blot’re on the user’s behalf.
Persisting and Using Existing Credentials
Authorized clients hold their credentials in memory and can continue to make authorized requests until they are shut down. For our weather app, we’ll need to persist these credentials so that the user does not need to authorize our app every time it is restarted.
The creds property of a client contains the current credentials:
client.creds
{ access_token: "MmFlNzY2NjktZTFkOC00YWE3LTg0OTYtOWRmNzFkMzAxNTE0",
  refresh_token: ZTk3ZDEwMTQtMGE5Mi00YzhlLTkyYWEtZjc4YjRlOTM2NjYw
  user: {
    id: "554666c3e4b0fa7f3e694afe",
    userName: "Matt",
    rootStream: "554666cde4b0fa7f3e694b00" } }
We could try manually saving the credentials before shutting down the application.
var writeClient = function(client) {
    // Store this someplace more secure for real apps
    fs.writeFileSync("data.json", JSON.stringify(client.creds));
};
But a better approach is to update the persisted data whenever the credentials are changed. Credentials may change on new authorization, when a refresh token is exchanged for a new access token, or for a variety of other reasons.
The optional onCredsChanged configuration entry is a function that is invoked whenever the client credentials are changed:
var CONFIG = {
    onCredsChanged: function(client) {
        writeClient(client);
    }
};

var client = new Blotre(null, null, CONFIG);
When our script is restarted, we can pick up the persisted client data and use it for the client.
var readClient = function() {
    try {
        var data = JSON.parse(fs.readFileSync("data.json"));
        return Blotre.create(data.client, data.creds, CONFIG);
    } catch (e) {
        return null;
    }
};
Updating a Stream
Now that our client app is fully authorized, we’re ready to start updating streams.
Getting a User’s Root Stream
When authorization succeeds, Blot’re provides basic information about the user who granted authorization.
client.creds.user
{ id: "554666c3e4b0fa7f3e694afe",
  userName: "Matt",
  rootStream: "554666cde4b0fa7f3e694b00" }
The rootStream property of user contains the id of the user’s home stream, which we can exchange for more detailed information.
client.getStream(client.creds.user.rootStream)
    .then(console.log);
{ id: '554666cde4b0fa7f3e694b00',
  name: 'Matt',
  uri: 'matt',
  created: 1430677197078,
  updated: 1430677230732,
  status:
   { color: '#2ce0fb',
     created: 1430677230732,
     poster: '554666c3e4b0fa7f3e694afe' },
  owner: '554666c3e4b0fa7f3e694afe' }
Authorized API Operations
Blot’re.js automatically attaches credentials to any API request that requires authorization. All mutation operations, such as a status or creating a new stream, require user authorization.
As long as user Matt authorized our client and we have a valid token, this should succeed:
client.createStream({
    name: "Weather",
    uri: 'matt/weather',
    status: {
        color: '#ff0000'
    }
});
Additionally, if the access token expires but a refresh token is present, Blot’re.js will automatically attempt to exchange the refresh token for a new access token and replay the request. This allows long running scripts to transparently update their credentials without user interaction.
Creating the weather stream
Let’s setup a new substream that our weather app. updateWeatherStream creates or updates the 'Weather' stream for the current user.
var updateWeatherStream = function(client, color) {
    return client.getStream(client.creds.user.rootStream)
        .then(function(rootStream) {
            return client.createStream({
                name: "Weather",
                uri: rootStream.uri + '/weather',
                status: {
                    color: color
                }
            });
        });
};
If the stream uri already exists, createStream simply updates the existing stream’s color. The result of createStream is the current stream.
We could alternatively use client.setStreamStatus if we knew the target stream’s id. This has lower overhead and is the preferred approach for production applications.
Bringing it All Together
Now let’s bring all these pieces together for our weather app.
Besides blotre, we’ll need a few other packages for our weather app: request-promise, cron, and colour-me-life
var Blotre = require('blotre');
var rp = require('request-promise');
var cron = require('cron');
var fs = require('fs');
Getting the Current Temperature
First off, getting the current temperature. We’ll use OpenWeatherMap since they provide free queries by zipcode.
var getWeather = function(zip) {
    return rp("http://api.openweathermap.org/data/2.5/weather?zip=" + zip + ",us")
        .then(JSON.parse);
};
We extract the temperature from the returned data. The temperature is in Kelvin so we’ll also convert it to Celsius
var toC = function(temp) {
    return temp - 273;
};

var getCurrentTemp = function(zip) {
    return getWeather(zip)
        .then(function(data) {
            return data && data.main && toC(data.main.temp);
        });
};
Temperature to Color
Directly basing our stream color on temperature value, such as 30C === 0x00001e would be boring. The color would make no visual sense and the transitions between temperature would be too small.
We want something more like a thermometer display, red for hot and blue for cold, so let’s use a simple mapping function to convert the temperature to a representative color.
colour-me-life allows us to define and sample a spectrum of colors.
var weatherSpectrum = new (require('colour-me-life'))();
weatherSpectrum.setSpectrum('blue', 'green', 'red');
weatherSpectrum.setNumberRange(0.0, 1.0);
Our temperature conversion scales temperatures to between 0C (#0000ff) and 37C (#ff0000) degrees celsius for sampling.
var tempToColor = function(temp) {
    var max = 37;
    var min = 0;
    var position = Math.min(max, Math.max(min, temp)) / max;
    return '#' + weatherSpectrum.colorAt(position);
};
Let’s check out the weather of 92328:
var ZIP = "92328";

getCurrentTemp(ZIP)
    .then(function(temp) {
        console.log("Temp:", temp, " Color:", tempToColor(temp));
    });
Temp:24.642 Color:#555600

Lovely.
You may want to adjust the mapping function to get slightly more appealing colors.
Updating the Weather Stream
Now let’s hook the temperature up to Blot’re.
updateWeather combines getCurrentTemp and updateWeatherStream to update the current user’s 'Weather' stream based on the temperature.
var updateWeather = function(client) {
    getCurrentTemp(ZIP).then(function(temp) {
        return updateWeatherStream(client, tempToColor(temp));
    })
    .then(function(data) {
        console.log("Updated", new Date(data.updated), data.status.color);
    })
    .catch(console.error);
};
Scheduling and Boot
The free application temperature data provided by OpenWeatherMap only seems to update every half hour, so hitting it up too often provides little benefit. To be conservative, let’s use cron to update the temperature data every ten minutes.
var start = function(client) {
    var job = function() {
        updateWeather(client);
    };
    job();
    cron.job("0 */10 * * * *", job).start();
};
And finally, when the script is first run we either want to pick up an existing client or create a new one.
var existingClient = readClient();
if (existingClient) {
    console.log("Found existing client");
    start(existingClient);
} else {
    Blotre.createDisposable({
        name: "The Global Toaster",
        blurb: "The current temperature"
    }, CONFIG)
        .then(function(client) {
            askAuth(client);
            tryRedeem(client, start);
        });
}
Update - June 6, 2015
The Blot’re CL framework provides all the logic for prompting the user and persisting creds. This greatly simplifies the creation of command line applications.
var BlotreCl = require('blotre-cl-framework');

BlotreCl({
    name: "The Global Toaster",
    blurb: "The current temperature"
}).then(start);
Conclusion
You should now be able to view your new Weather stream on Blot’re. Hopefully this walkthrough demonstrates how easy it is to integrate simple applications with Blot’re.
Checkout the source for this demo and the documentation for Blot’re.js.
Color on.